当多个开发人员合作开发一个前端项目时,代码质量和一致性是非常重要的。在大型项目中,代码质量和一致性的缺失可能会导致团队之间的沟通问题和代码维护的困难。为了确保代码质量和一致性,前端编程规范工具链是必不可少的。
它可以帮助团队在整个开发周期内保持代码风格的一致性,减少错误和冲突,并提高代码质量和效率。在这篇文章中,我们将介绍一些常用的前端编程规范工具,以及它们如何帮助团队提高代码质量和效率。
Husky
Husky 是一个 Git 钩子工具,可以在 Git 操作(例如提交或推送)之前运行脚本。它可以帮助团队确保代码符合前端编程规范,并在提交或推送之前运行 ESLint、Prettier 和 Stylelint 等工具。
Git Hook
Git hook 都被存储在 Git 目录下的 hooks 子目录中。 也即绝大部分项目中的 .git/hooks 。 这些以 .sample 结尾的文件都是在 git init 初始化时,git 默认安装的示例文件,这些文件都是 shell 脚本,移除后缀就可以启动了。
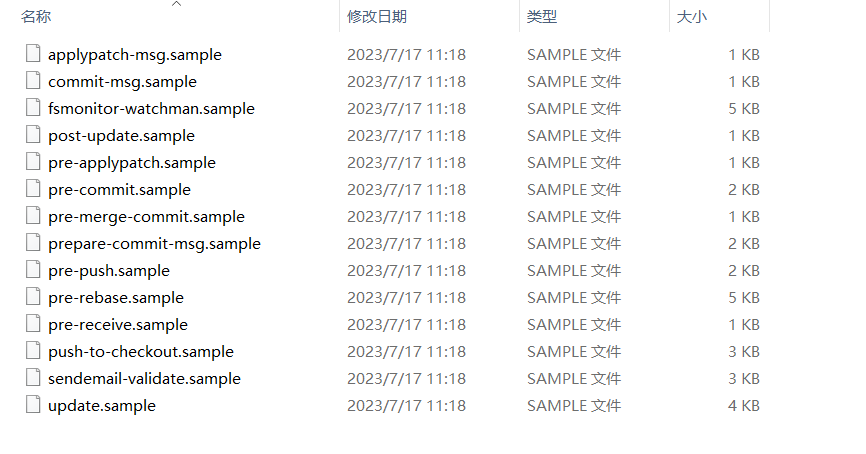
这些钩子的执行时机和作用如下:
| 分类 | 钩子 | 描述 |
|---|---|---|
| 提交工作流钩子 | pre-commit | git commit 前运行,可以检查代码风格是否一致、单元测试等 |
| prepare-commit-msg | 钩子在启动提交信息编辑器之前,默认信息被创建之后运行。 它允许你编辑提交者所看到的默认信息。 | |
| commit-msg | 接收一个参数,git commit 信息的文件路径(默认为.git/COMMIT_EDITMSG) | |
| post-msg | git commit 之后运行,一般用于通知之类的事情,如:git log -1 HEAD | |
| 电子邮件工作流钩子 | applypatch-msg | 它接收单个参数:包含请求合并信息的临时文件的名字。 如果脚本返回非零值,Git 将放弃该补丁。 你可以用该脚本来确保提交信息符合格式,或直接用脚本修正格式错误。 |
| pre-applypatch | 它正好运行于应用补丁之后,产生提交之前,所以你可以用它在提交前检查快照。 你可以用这个脚本运行测试或检查工作区。 如果有什么遗漏,或测试未能通过,脚本会以非零值退出,中断 git am 的运行,这样补丁就不会被提交 | |
| post-applypatch | 运行于提交产生之后,是在 git am 运行期间最后被调用的钩子。 你可以用它把结果通知给一个小组或所拉取的补丁的作者。 但你没办法用它停止打补丁的过程 | |
| 其它客户端钩子 | pre-rebase | git rebase 之前 |
| post-rewrite | 被那些会替换提交记录的命令调用,比如 git commit –amend 和 git rebase(不过不包括 git filter-branch) | |
| post-checkout | git checkout 成功运行后 | |
| post-merge | 在 git merge 成功运行后 | |
| pre-push | 会在 git push 运行期间, 更新了远程引用但尚未传送对象时被调用 | |
| 服务器端钩子 | pre-receive | 处理来自客户端的推送操作时,最先被调用的脚本是 pre-receive。 |
| update | update 脚本和 pre-receive 脚本十分类似,不同之处在于它会为每一个准备更新的分支各运行一次。 | |
| post-receive | post-receive 挂钩在整个过程完结以后运行,可以用来更新其他系统服务或者通知用户。 |
这里只是简单的介绍了下各个钩子的作用,要想更深入的了解这些钩子,请看官方文档:自定义 Git - Git 钩子
既然把一个正确命名(不带扩展名)且可执行的文件放入 .git 目录下的 hooks 子目录中,即可激活该钩子脚本。为什么还要使用 husky ,这是因为 .git 目录下的文件变动 git 本身是无法监听到的,无法统一管理 hook 脚本。
Husky 低版本安装
1 | #1、安装husky |
Husky 高版本安装(从 v6.0 之后)
使用方法 1:
1 | #1、安装 husky |
推荐使用方法:
1 | # 安装 husky,修改 package.json 配置,默认添加 pre-commit hook |
添加其他 git hook 如下:
1 | npx husky add .husky/commit-msg 'npx --no-install commitlint --edit "$1"' |
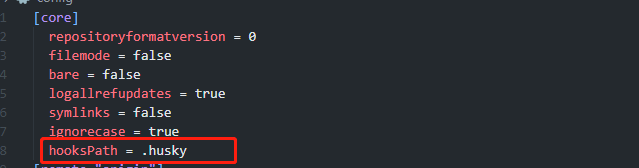
npx husky install 做了两件事:
- 在根目录新建.husky 目录,用于存放 git hook;
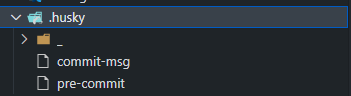
- 修改 .git/config 配置文件,core.hooksPath = .husky(指向 husky 新建的目录)
huksy 在 6.0 时有个破坏性升级,hook 配置方式和之前皆然不同,为什么放弃之前的配置方式:
中文可以参考这篇husky 使用总结
Lint-Staged
lint-staged 是一个 Git 钩子工具,可以在 Git 操作(例如提交或推送)之前运行脚本。它可以帮助团队**仅对更改过的文件(暂存区中的文件)**运行 ESLint、Prettier 和 Stylelint 等工具,从而提高效率并减少不必要的检查。
- 安装 lint-staged
1 | # |
- 在 husky 中添加 pre-commit 钩子,执行 lint-staged 命令
1 | !/bin/sh |
- 在 package.json 中添加配置
1 | { |
Prettier
Prettier 是一个自动化代码格式化工具,可以根据预定义的规则自动格式化代码。它支持多种编程语言,并且可以与 ESLint 集成以确保代码风格的一致性。Prettier 可以与大多数编辑器和 IDE 集成,以便在编写代码时自动格式化代码。
Prettier 不仅仅是一个代码格式化工具,还是一整套风格指南,并且大部分规则不可改变。作者在在 Prettier 官方文档的 “Why Prettier?”章节中,详细回答了这么做的原因。虽然有一个通用的代码风格对项目和团队来说很有好处,但是编码是个特别情绪化的过程,就像一千个读者就有一千个哈姆雷特一样,每个人钟意的风格都不一样,开发已经很累了,没必要浪费时间讨论风格问题。Prettier 使用争议最小的编码风格,足以让大部分人满意了,考虑到 Prettier 的独特优势,这些“牺牲”还是值得的。
- 安装 prettier
1 | npm install --save-dev --save-exact prettier |
- 配置 prettier 风格
prettier 支持多种格式的配置文件 Configuration File · Prettier
1 | echo {}> .prettierrc.json |
添加个空的配置文件是为了告诉 vscode,你的项目正在使用 prettier,配合 [Prettier - Code formatter](Prettier - Code formatter) 插件可以实现保存时自动格式化
- 添加忽略文件
1 | Ignore artifacts: |
- 格式化
1 | npx prettier . --write |
直接使用 **npx prettier . --write** 会格式化整个项目的所有代码,这很没必要,配合 lint-staged,只格式化改动的代码。
1 | { |
ESLint
ESLint 是一个非常流行的 JavaScript 代码检查工具,可以帮助团队确保代码风格的一致性。它支持大多数 JavaScript 代码风格,并且可以通过插件进行扩展以满足团队的特定需求。ESLint 还可以与许多编辑器和集成开发环境(IDE)集成,以便在编写代码时自动检查代码。
配置 Eslint
- 安装 eslint
1 | npm install --save-dev eslint |
- 添加任一支持的配置文件格式的 .eslintrc 文件。
1 | 创建 JavaScript 配置文件 |
- 添加配置
1 | // .eslintrc.js 示例 |
具体的 Eslint 规则配置这里不多介绍了,可以看下这篇文章 - 看完这篇文章,我不信你还对 eslint 一知半解
- 执行检查命令
1 | npx eslint project-dir/ file1.js |
解决 Eslint 和 Prettier 冲突的问题
当在项目中同时配置 Eslint 和 Prettier 时就会出现冲突的问题,这是因为 Eslint 可以同时进行代码风格及质量校验,因此在代码风格方面就和 Prettier 冲突了,这个时候我们希望代码格式由 Prettier 负责就好,而 Eslint 只需负责代码质量。
解决方案时借助 eslint-config-prettier 和 eslint-plugin-prettier。
- eslint-config-prettier 作用是关闭 eslint 中与 prettier 冲突的规则。
- eslint-plugin-prettier 作用是让 eslint 用 prettier 来格式化,相当于当代码格式不符合 prettier 的配置的时候,也可以报错一个 eslint 错误。
修改配置如下:
1 | module.exports = { |
最后同样使用 lint-staged 只格式化改动的文件:
1 | { |
如果在上一步你的 vscode 配置了保存后 prettier 自动格式化,那么就会出现 prettier 格式化后,eslint 报错的问题,其解决方案也很简单,使用 eslint 去格式化:
使用 prettier 格式化配置如下:
“editor.formatOnSave”: true, // 保存后自动格式化
“editor.defaultFormatter”: “esbenp.prettier-vscode”, // 默认使用 prettier 格式化
“[javascript]”: { // 手动配置各种文件的格式化工具“editor.defaultFormatter”: “esbenp.prettier-vscode”
}修改后,使用 eslint 格式化
“editor.formatOnSave”: false, // 禁止保存后自动格式化
“editor.codeActionsOnSave”: {“source.fixAll.eslint”: true
}
Commitlint
Commitlint 是一个 Git 提交消息检查工具,可以帮助团队确保 Git 提交消息的一致性和规范性。它可以检查提交消息的格式、结构和内容,并提供有用的错误提示和建议。Commitlint 可以与 Husky 集成,以便在提交代码时自动运行。
要将 commitlint 集成到项目中,需要安装以下工具:
- @commitlint/cli:用于校验 Git 提交信息格式
- @commitlint/config-conventional:一套约定式的 commit message 书写规范(可选,可以自定义规范)
- @commitlint/prompt-cli:交互式 commit message 书写工具
- commitizen:同 @commitlint/prompt-cli,二选一就行
- @commitlint/cz-commitlint:commitizen 的适配器
- cz-git:同 @commitlint/cz-commitlint,二选一就行
上面 commitlint 的工具链也是非常多的,不需要都安装,按需使用即可,这里我们选择 @commitlint/cli + commitizen + cz-git
- 安装
1 | npm install @commitlint/cli commitizen cz-git -D |
- 添加配置文件,这一步我们不使用 @commitlint/config-conventional,而是自定义规范
1 | const fg = require("fast-glob"); |
- 在 package.json 中添加如下配置
1 | { |
- 添加 commit-msg 钩子
1 | #!/usr/bin/env sh |
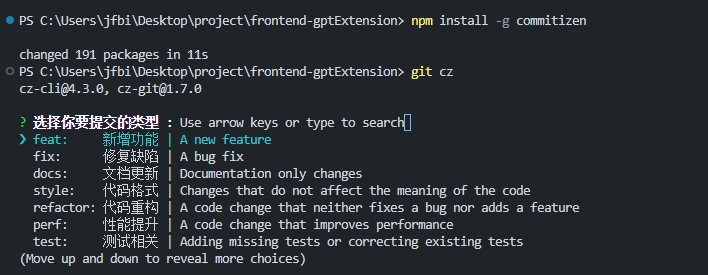
上面的配置都完成后,运行 pnpm cz,按照提示填写 commit 信息:

也可以全局安装 commitizen,之后使用 git cz 命令替换 git commit 命令: